Travel and Study Abroad–Digital Edition

This week’s Digital Pedagogy workshop, “Travel and Study Abroad: Digital Edition,” will occur Tuesday, December 1, from 4:30–5:30 pm, with a repeat on Wednesday, December 2, from 11:00 am–noon. The location is the library computer lab (Abell 208).

janterm15_dominicanrepublic_herohome

For our final DP@AC workshop of the semester, we thought it would be appropriate to devote a session to digital pedagogy and the study abroad experience, what with many of our faculty and students preparing for international travel during Jan term and beyond. With so many experienced travelers in our community, there should be plenty of wisdom about what to do (and what not to do) with technology during study abroad. Let’s see if we can share some of that collective knowledge for everyone’s benefit.

International study takes a variety of forms at Austin College, and technology needs may vary accordingly. A three-week Jan term differs from a semester or year abroad, and Global Outreach Fellowships and internships also offer distinct contexts. Many variables affect how you approach the use of digital tools when traveling for study. (And I know that some study trips involve only domestic travel…still, much of what we might say here applies in those situations as well.) The specific locations, the time length of the travel, the nature of the activities, the expectations and requirements of the instructors…these and other factors obviously shape how you might use digital technology.

Right off the bat we should acknowledge a paradox regarding this topic. On the one hand, attention to devices and screens should not draw time attention away from immersion and experiences in new cultures and surroundings. You’re there to learn with and from the people of whatever region you’re visiting, so, as much as possible, be in the moment in a more immediate (and less mediated) way. On the other hand, a study abroad trip is an ideal opportunity to document and construct a rich digital record of what you are learning and to share that learning with others.

Typical study abroad digital pedagogy projects include digital storytelling and blogging. Digital stories are particularly common and may be a requirement not only of the instructor but also possibly of a scholarship, funding source, or program. GO Fellows and Stevens Scholars, for instance, are expected to produce digital stories upon completion of their programs. For dozens of examples of digital stories produced by AC study abroad students in the last several years, check out the “International Experiences” and the “Global Outreach (GO) Fellows” playlists on the Austin College YouTube site. Instructors may also expect students to keep journals with daily or regular entries during the travel time. Blogs are ideal for capturing these reflections and making them available for a wider audience.

In terms of the technology itself, what you need to think about falls into these categories:

Devices  

The main decision here is whether to use a smartphone or a dedicated digital camera for taking pictures and recording video. The phone is likely to be the device of choice, since everyone probably already has one. But for certain projects there may be a need for high quality images, in which case a camera may be preferable. A camera might have longer battery life, and of course you  would also bring your charger and possibly some extra battery packs. If you are doing interviews and/or want to capture just audio, you might consider a dedicated voice recorder, though there are apps for the phone that might work as well.

Bringing a laptop obviously gives further computing power, but may not be necessary for shorter trips. If you are going to be blogging to document the trip, a laptop is certainly handy. Check ahead to see if there are reliable internet cafes where you are going…that might obviate the need to bring your own computer. Tablets are also a possibility.

Every device carries a risk of being damaged, lost, or stolen, and of course security arrangements can vary widely.

Power

Because electrical systems around the world vary in terms of outlet configuration and voltage, you’ll need to bring a universal adapter plug-in kit and, possibly, an electrical voltage converter. Look at this world standards table, which gives plug, socket, and voltage information by country, and links to diagrams of different plug types (there are 15 around the world). Check ahead and make sure that whatever you buy will work in the places you’re going. Many adapters these days have one or more USB ports built in, which might be helpful.

Most electronic devices these days are designed for a global market and will automatically handle electrical voltages of 110-240 volts (the range around the world) and frequencies of either 50 or 60 Hz. But you should be sure about this by checking the labeling on the device or the owner’s manual. However, you may also be bringing other electrical devices, such as shavers or hair driers, that only work on the 110 volt system here in the US. To use those in many places abroad, you will need a voltage converter, or your appliance will get fried.

A typical power problem is that a phone will not make it through the day on a full charge. In these situations, it may be worth having a small portable battery charger on hand to keep you juiced up. A good choice would be this model by Anker. Charge it ahead of time, and then take it with you to recharge your phone as many as four or five times. It is one more thing to carry around, but could be a lifesaver when you have to use your phone and the battery is running out.

Storage

You will need adequate storage for the anticipated number of photos/videos and other data, either internally or with memory cards. Phones have a certain amount of internal storage (16 GB, 32 GB, etc.), and may or may not have a slot for a memory card. Cameras also take memory cards to store their images. Look at your device to be sure what kind of card it takes…standard SD, mini-SD, and micro-SD are the typical sizes. Each kind of card also has a specific speed class and storage capacity. Consult your owner’s manual (look it up online if you don’t have the hard copy) and check out articles such as this to help you determine what you might need. Storage is relatively cheap, so you might as well get more rather than less.

Typically you will offload you files on a regular basis from the phone or camera onto a laptop hard drive and/or into a web-based storage service such as Google Drive or Dropbox, or a social media repository (Flickr, Instagram, YouTube, etc.). Be sure you have the right cable to transfer to a laptop. For uploading to the cloud, the main issue will be internet connectivity, about which see below.

Connectivity

Just like at home, having a reliable connection to the internet is often the sticking point in an otherwise smooth digital experience. Connections will come either via Wifi (for laptops and mobile devices) or cellular networks (for phones and some tablets). In general, you should not count on solid internet connectivity ahead of time, unless you are absolutely sure. Wifi availability, reliability, security, and costs vary widely. You’ll have to do your research ahead of time and on the fly to determine whether and how wifi will be available where you are traveling. Many places of lodging will provide access, as will public spaces such as trains and shops, but find out about costs and security beforehand.

Using your phone with cellular networks abroad is even more complicated. This article by Holly Oberle, “Cell Phones and SIM Cards for Living Abroad–Update,” is the single best resource I have located to cover the range of variables to be considered here. The major US carriers do offer international plans, but at a steep cost. In lieu of that option, the first question to ask is whether your current phone will work when traveling abroad. In general, the answer is “yes” if 1) you are not in a contract; 2) your phone is GSM compatible; and 3) your phone is unlocked. If that’s the case, then all you’ll need to do is to buy a SIM card for wherever you are going. Oberle suggests purchasing the card before leaving the US, so that you can use your phone as soon as you arrive at your destination. Then you can always buy a new SIM with better rates later.

If your phone does not meet these criteria, and you still want cellular internet access, then you’ll need to acquire an unlocked, out-of-contract, GSM-compatible phone, either here or in the host country. Then you’ll need a SIM card to go with it. If you are traveling to more than one country, you may need to buy multiple SIM cards. The other option for using your phone for communication, apart from cellular networks, is through using applications like Skype and Viber when you have a good wifi connection.

Apps

Mobile apps for travel and study abroad may include many that you are currently using. One of the major considerations with apps is whether you will need a network connection (see above) in order to use them. Mapping and geolocation apps are obviously very useful when traveling, and, fortunately, are increasingly being designed to function well even without network connection. For example, Google Maps, probably your best overall choice, has just introduced “Offline Maps,” with enhanced capabilities for offline use of directions, turn-by-turn voice navigation, and search for information about local places of interest (galleries, museums, restaurants, etc.). You’ll need to download the maps ahead of time, when you do have network access. There are limits to the size of the offline map you can download, but you can download multiple maps. So if you wanted, say, an entire country, you could save multiple maps of its different areas. Offline Maps is currently available for Android, with the iOS version promised by the end of the year. You can also find other apps in this category, such as CityMaps2Go, Pocket Earth Pro, and Maps.Me.

Travelers to non-English speaking regions should consider downloading a good dictionary of the host language. Again, I recommend storing on your phone rather than relying on the chance of an internet connection. Most good dictionaries and language resources cost a few bucks, but unless you are absolutely fluent in the host language, it’s probably well worth it. Check with your instructors or other folks in the know and read reviews to find out what apps would be best for you.

Many museums, galleries, and other places of cultural interest, as well as cities and locales, have their own official or unofficial apps to provide visitors with an enhanced experience. Just search the app store and look online for reviews. You can probably find guided audio tours of many major sites; but plan ahead, and download the audio files to your device when you have internet access. That way you can listen to them at the site without a connection. Be sure to bring earbuds along.

Messaging and voice-over-internet apps are obviously useful, as long as you have a network connection. There’s Skype, Facebook Messenger, Twitter, WhatsApp, Snapchat, Viber, and a host of other possibilities. In addition to the map apps listed above, other transportation related apps specific to a region or carrier (e.g., DB Navigator for Deutschbahn) might be worth installing.

These are just a few things to keep in mind among the many details of planning for travel and study abroad. Again, I’m sure our travel veterans can augment this advice, so please contribute your ideas, either here in the comments, on the Facebook group page, or, of course, at our two sessions this week.

Curated Resources

Intellectual Property, Copyright, and Open Pedagogy

“Copyright, Creative Commons, Fair Use, Public Domain” by Langwitches is licensed under CC BY NC SA 2.0

This week’s Digital Pedagogy workshop, “Intellectual Property, Copyright, and Open Pedagogy” will occur Tuesday, November 17, from 4:30–5:30 pm, with a repeat on Wednesday, November 18, from 11:00 am–noon. The location is the library computer lab (Abell 208).

Over the course of this semester we’ve looked at many pedagogical practices and associated technologies that result in the creation, by instructors and students, of new intellectual content and its representations in digital formats. Such content and representations are intellectual property. Usually, that content incorporates or in some way draws upon existing content, which of course is also intellectual property. In addition, then, to the pedagogical and technical factors involved in using digital tools and applications, there are legal and ethical considerations that may need to be addressed. Copyright, fair use, open access, citation, attribution, plagiarism, etc….how do we begin to sort out what we need to know and do in order to act responsibly?

We approach these matters both from the user side (what can I do with content that others have created?) and the owner side (what do I want others to be able to do with what I have created?). In either case, the same fundamental principles apply. For example, as soon as a work is created–a line of text or code, a photograph or drawing, a set of data, etc.–copyright law automatically comes into play. There is no need to apply for coverage, affix a notification, or even publish what has been produced. How that work can then be used by others, in educational settings and/or in newly created works, is a matter of interpretation that is broadly guided by the “fair use doctrine” that is part of the copyright statute. There are many variables that come into play, and the principles of fair use are intentionally vague; thus, determinations generally must be made on a case-by-case basis.

Obviously, intellectual property is a huge and complicated topic, so the goal here is mostly to introduce the subject, pull together a few helpful resources, and provide a space to discuss specific cases where you might be unsure about what’s appropriate, either for your own scholarship or that of your students. What are typical situations that might arise at Austin College with respect to intellectual property issues? Who do you turn to for advice and information, and/or what resources do you consult? I think we could all benefit from some open conversation about how we as an academic community address these issues. Abell Library has a copyright policy for library course reserves that you should be familiar with, but that covers just one limited set of circumstances out of many possible scenarios in which intellectual property concerns may arise.

For a broader introduction to intellectual property, an excellent resource that I have discovered is the Copyright Crash Course developed by copyright attorney Georgia Harper at the University of Texas Libraries. Sometimes, there really is no need to reinvent the wheel. This comprehensive guide offers clear explanations on topics from the perspective of both the producer and the consumer of intellectual property, with additional sections on library and institutional concerns. As Harper points out in her introduction,

The role of copyright in the flow of research is undergoing dramatic and exciting change. It’s occurring at the margins right now, but it will one day extend to every aspect of scholarly endeavor. This is a very exciting time to be an academic. The options for scholarly communication have never been broader or more effective. You’ll find discussion of copyright woven all through important aspects of research and teaching, such as

  • the use of others’ works in the classroom, in fieldwork, and the laboratory
  • building on the works of others to create new works
  • open source software development
  • use and reuse of datasets
  • Creative Commons licensing of educational resources
  • open access to research results and its acceleration of the pace of scientific discovery
  • the digitization of books in the public domain and digital access to works still in print as well as orphan works
  • the resulting opportunities to discover knowledge that’s been hard to access in the past.

Really…just check it out. You can even take a quiz at the end to assess you knowledge 😉

Another fine resource that I would recommend is a screencast produced by my colleague Chris Lott, entitled “Copyright and Fair Use.” This is an excellent short overview with an especially helpful description of fair use within educational settings.

https://youtu.be/LT00tQFS3oo

Both Harper and Lott emphasize the fact that educators should not be afraid to exercise their rights under the doctrine of fair use. It is a right, not a privilege. There are no known cases in which an individual educator has been successfully prosecuted for infringement in a fair use case. Nonetheless, it is incumbent upon instructors to be familiar with the law in general and with the “four factor test” of the fair use doctrine, in particular, in order to make appropriate judgments on a case-by-case basis.

One of the most important movements in intellectual property management that has developed in the digital era is Creative Commons, a public non-profit that has developed a standardized set of licensing permissions that allow content owners to make their work available for reuse on their own terms. In turn, this licensing system is creating an expanding set of resources that can be freely and legally used by others.

If you want to give people the right to share, use, and even build upon a work you’ve created, you should consider publishing it under a Creative Commons license. CC gives you flexibility (for example, you can choose to allow only non-commercial uses) and protects the people who use your work, so they don’t have to worry about copyright infringement, as long as they abide by the conditions you have specified.

If you’re looking for content that you can freely and legally use, there is a giant pool of CC-licensed creativity available to you. There are hundreds of millions of works — from songs and videos to scientific and academic material — available to the public for free and legal use under the terms of our copyright licenses, with more being contributed every day.

This infographic from Creative Commons lays out the basic scheme of the licenses, from most to least open:

creative-commons2 (1)

Creative Commons licenses do not replace copyright; they attach qualifications and terms to it. CC licenses, widely used online, are placed on works by their owners in order to specify how others may use their work. The underlying intent of Creative Commons goes far beyond simply property management; it is even more a means of creating an ethos that promotes the openness and sharing of content on the broadest possible terms.

Thus, as the title of this post indicates, my perspective on intellectual property is enveloped by broader interests in “open pedagogy” as a philosophical framework for teaching and learning. David Wiley has championed this approach and, with respect to open educational resources (OER) in particular, has developed the “5R” approach to educational materials, encouraging creators to grant the following permissions for their content:

open

In her essay “What is Open Education?,” philosophy professor Christina Hendricks builds on this foundation to further articulate an open approach to teaching and learning:

Examples of open pedagogy include activities from asking students to make public blog posts (or posts that are at least shared with the rest of the class, even if they are not public), having students create websites or wikis that showcase a research project they have completed, encouraging students to revise OER and re-share them for other students, teachers and the public, to opening one’s classroom activities to participation by those not officially registered in the course (such as by having discussions on social media, opening up presentations by doing them on webinars, and more).

So, what are your experiences in dealing with these issues? Share with and learn from your colleagues here in our comment section and at our workshops this week.

Curated resources

Just in Time: Visualizing Knowledge with Digital Timelines

This week’s Digital Pedagogy workshop, “Just in Time–Visualizing Knowledge with Digital Timelines,” will occur Tuesday, November 10, from 4:30–5:30 pm, with a repeat on Wednesday, November 11, from 11:00 am–noon. The location is the library computer lab (Abell 208).

A few weeks ago we explored digital maps as forms of knowledge representation that draw upon the spatial and geographical dimensions of our knowledge. Likewise, much of what we know has a temporal aspect–history comes to mind, obviously, but many other examples of chronological sequentiality in information could be adduced, such as the arc of a fictional or documentary narrative, the series of arguments in a debate, or the stages of a scientific experiment. In some cases we wish to present information with both spatial and temporal dimensions, and a tool such as Story Maps makes that possible. In other situations, the spatial dimension is negligible, and/or we wish to foreground the temporal dimension, and thus we might select a tool that focuses on the narrative aspects of our knowledge.

timeline jsIn this week’s workshop we’ll examine the practice of creating timelines to visualize information in its temporal dimension. Specifically, we’ll take a look at Timeline JS, a tool created by the Knight Lab at Northwestern University. The basic idea of a timeline is simple–you have a number of discrete items or events that are sequentially related, which are then plotted against a single line marked by the appropriately-scaled chronological divisions. Each item opens up a larger unit of information, context, and further resources. Digital timelines allow the incorporation of text, image, audio, video, and other rich media elements. Students can then visually apprehend the temporal relationships among various items of a topic, and at the same time access further levels of information about a given item.

Derek Bruff of Vanderbilt has students in his cryptography course build an online timeline of the history of cryptography using Timeline JS. (Thanks and a shout out to Derek for making his course public so that we can all learn from his innovative pedagogy.) Here’s a blog post with some details about the assignment. And here’s a shot of the section from about 1900 to 1940, currently highlighting an item on the Choctaw Indian code talkers of World War I:

crypto timeline shot

Items can be placed on the timeline to correspond to a discrete point or a span of time. They can be grouped into subcategories to further distinguish different types of items or events. Clicking on an item displays its content, which, again, can include textual description and a wide range of media elements. Navigational arrows allow forward and backward scrolling from one item to the next, or one can quickly scroll through the timeline as a whole.

Building a timeline in Timeline JS is very user-friendly. A Google Drive account is required, because the information for the timeline is entered into a Google Sheets spreadsheet. Simply download the spreadsheet template from the Timeline JS website; each row corresponds to a single item, and the columns are already set up with the categories of information that are needed to populate the timeline. Here’s an image of a section of the spreadsheet for the cryptography project:

crypto spreadsheet

Each item has a start time; the end time parameters are used if needed to indicate that the event covers a span of time. Headline and text content are entered in the appropriate cells. Each item can incorporate one media element via a URL entered into the “Media” column. Timeline JS has built-in support for incorporating media from a wide variety of online content sources, including “Twitter, Instagram, Flickr, Google Maps, DropBox, DocumentCloud, Wikipedia, SoundCloud, Storify, iframes, major video sites (YouTube, Vimeo, etc.) and more.” Once all the data has been entered, the URL for the Google doc is used at the Timeline JS website to generate several lines of code  called “embed code.” That code is then pasted into the website that hosts the timeline (thus, you need to have a place on the web to host the project). Once published, the timeline is automatically revised and updated when changes and additions are made to the spreadsheet.

This arrangement facilitates collaboration among students, because the spreadsheet can be accessed by any number of them at any time. In Bruff’s case, he also has the cryptography timeline build from one iteration of the course to the next, so that each group of students is further enriching an already existing resource. Depending upon the number of items to be plotted and the intervals of time between them, the scale of the timeline can expand or contract in order to provide an appropriate visual representation.

Timelines of this kind do operate with an underlying concept of linearity, which in some cases may not be able to adequately represent the relationships among data and events. For example, phenomena that are more cyclical or recursive in nature might not be good candidates for representation with a linear timeline. And there may be concern in some situations that a linear timeline suggests a simplistic pattern of cause and effect or even promotes an unwarranted doctrine of progress. But these instances could then provide opportunities to engage students in deeper conversations about temporality and different ways of interpreting the connections among events and ideas.

Timeline JS is actually just one of a suite of tools developed by the Knight Lab that you might find of interest for creating compelling narrative presentations. There is also SoundCite, which embeds audio clips directly into the text of a story; Juxtapose, which creates a “slider” for before-and-after comparison of photos and images; and  StoryMap, which is similar in both name and function to the StoryMaps application from ArcGIS that we previously explored.

Once again, we look forward to seeing you this week.

Curated resources

Annotate the Web with Hypothes.is

This week’s Digital Pedagogy workshop, “Annotate the Web with Hypothes.is,” will occur Tuesday, November 3, from 4:30–5:30 pm, with a repeat on Wednesday, November 4, from 11:00 am–noon. The location is the library computer lab (Abell 208).


A previous DP@AC blog post explored the theme of annotation, marginalia, and textual commentary and markup as we transition from analog and print to digital forms of text and media. There is growing interest among academics, scientists, and journalists, among others, for making web-based documents open to enrichment with comments, questions, explanations, references, links, glosses, and other forms of markup that are tied to specific words and phrases of the text and that are situated in the context of the document itself. Among the applications being developed to make this possible is Hypothes.is, which “seeks to enable a conversation over the world’s knowledge” by “leveraging annotation to enable sentence-level critique or note-taking on top of news, blogs, scientific articles, books, terms of service, ballot initiatives, legislation and more.”

Brian Watkins is planning to use Hypthes.is in his spring 2016 class, History of Anthropological Thought. As Brian points out in his Mellon grant proposal for the project,

I have taught my upper level course, History of Anthropological Thought, three times in three different institutional settings, and I can say that students have consistently found one part of the class to be the most important and yet the the most impenetrable: the texts of the anthropological theorists themselves. I wondered if there was a way to make them more accessible. I can’t make the text any easier to read, nor could I legitimately choose simpler theorists. What if, instead, it were possible to change the way students engage with the texts? I recently learned about a set of technologies which I believe could achieve this goal: social annotation software.

…[M]y current plan is to use software called Hypothes.is. Instead of struggling alone with Claude Lévi-Strauss or Victor Turner, students could connect with others in sharing their struggles and insights. Students would log in and see where in the text other students had questions, tentative answers, or are debating over the meaning of a key term. I would be able to log in before class and see how the reading went and adjust the class discussion accordingly. In an 80 minute class, I would typically spend the first half discussing the texts with students, and it is my hope that this software makes that discussion much more interactive.

Brian’s students will be reading many texts in pdf format; the texts will be scanned, processed with optical character recognition, and uploaded to the course Moodle site. This past summer he and I tested Hypothes.is with one of those texts, a journal article by Bruno Malinowski entitled “Kula: The Circulating Exchange of Valuables in the Archipelagoes of Eastern New Guinea” (Man, Volume 20 [Jul., 1920], 97-105). Here are a few screenshots displaying some annotations we made on the first page of the article. First, this is the page with several highlighted phrases, each indicating a distinct annotation, but without the annotation panel visible:

kula

Next, I click the first highlighted spot to open the Hypothes.is side panel and reveal the associated annotation. I had annotated Malinowski’s passing reference to “Dr. Seligman’s Melanesians” to provide the full title and a link to the book in Google Books:

kula1

Another click on the phrase closes the Hypothes.is panel, and returns us to the original view. For the second annotation, on the phrase “Gulf of Papua,” I inserted a map of that region; again, clicking on the highlight opens the annotation panel to reveal the map:

kula2

The third annotation shows a comment and reply:

kula3

And we could continue, but I think you get the point. With Hypothes.is, you can easily annotate any text that can be displayed in a web browser. Students can pose questions, register observations and analyses, debate interpretations, add supplementary resources, and create further forms of marginalia. They can reply to one another’s comments and generate conversation threads. These annotations remain attached to the original document but can also be tagged and searched. Students thus read and annotate texts in a social environment that opens up greatly enhanced possibilities for engaging the subject matter and one another. Jeremy Dean’s recent blog post, “Back to School with Annotation: 10 Ways to Annotate with Students” offers an excellent overview of distinct annotation use cases.

Hypothes.is is also being used by a group of climate scientists at the Climate Feedback project to comment upon and evaluate articles and documents related to climate change:

Using the Hypothesis annotation platform, our community of scientists go through a variety of online media articles and provide ‘feedback’ on the scientific accuracy of the information presented. Readers can view these annotations directly alongside the original texts and see exactly where the article’s information is consistent — or inconsistent — with scientific thinking and state-of-the-art knowledge in the field.

For example, here is a small section of their analysis of a recent article in Forbes, “Updated NASA Data: Global Warming Not Causing Any Polar Ice Retreat” (they rate the entire article as having “very low” scientific credibility):

climate

Hypothes.is thus seeks to fulfill the original vision of those who developed the web browser: to make it possible to mark up and creatively interact with web pages and to enable robust conversations about their content.

There’s much more, so check out the resources listed below and come to our workshop this week for conversation and demonstration.

Curated Resources

Social Bookmarking as a Knowledge Management Practice

This week’s Digital Pedagogy workshop, “Social Bookmarking as a Knowledge Management Practice,” will occur Tuesday, October 27, from 4:30–5:30 pm, with a repeat on Wednesday, October 28, from 11:00 am–noon. The location is the library computer lab (Abell 208).

You’re reading an article or essay online and thinking, “This is interesting…I’d like to save this and refer to it in the future.” What do you do? Download the article into a folder on your hard drive? Bookmark it under “favorites” in your browser? Write down the URL on a scrap of paper? And let’s say you want to share it with a colleague…now what? Email them the link? Post it on your Facebook timeline or group page? Tweet a link?

What we’re dealing with here is an issue of knowledge management. As we discover items of value on the web, we need a practice for marking those items that we might want to come back to at a later time. And we might want to organize a rapidly growing personal library of links with categories and tags. And it might be valuable if we could also see what other people in our field are finding worthwhile enough to mark and save. Then, throw in the further possibility of highlighting or commenting upon the article, and interacting with other readers. And perhaps creating specific groups (like a class) that share those articles and resources.

Welcome to “social bookmarking,” a web-based knowledge practice that has been around in one form or another pretty much since there have been web pages. Several platforms and services have come and gone in the last decade. Delicious was the first such application of note but has fallen on hard times in recent years. Then there is Pinboard, which advertizes itself as “social bookmarking for introverts.” Pinboard has a minimalist geeky vibe but seems to be tailored mostly for those who want to keep their bookmarks to themselves (hence, the introvert). But even introverts like to see what other introverts are up to at times.

diigo

Among academics in my circles and networks, the social bookmarking platform of choice is Diigo. Diigo, which stands for “digest of internet information, groups, and other stuff,” is a robust tool for creating a personal online information archive and connecting that archive to those of colleagues. Both Brett and I have used Diigo for several years now and, at latest check, we have each saved about 3,000 links to our personal libraries. Both of our libraries are set to be publicly accessible; you can see mine here and Brett’s here (you don’t need to have an account to view someone’s public library). Items that are added to “My Library” can be tagged or listed to organize your content; or, if you’re a bit lazy like me, you can just use Diigo’s search function to find links, assuming that you can remember an article’s author and/or a keyword or two.

The networking and group features of Diigo are particularly useful. For example, I have about fifteen other Diigo users that I follow in “My Network,” which allows me to see what bookmarks they are saving and to thus find further connections to information that I might find interesting. I can easily check what Brett and other people that I follow (such as George Siemens, Derek Bruff, Rebecca Davis, Bryan Alexander, etc.) thought valuable enough to save. And, if they have made highlights to articles, I can see those too, which gives me a more fine-grained sense of what they found particularly insightful or worthwhile. What’s also neat is that, for anyone in my network, I can then see who is in their network, which lets me potentially find more cool people to follow.

In addition to adding people to a network, users can create “groups” in which a specific number of people share links and notes on a given topic. These groups can be open for anyone to join, or restricted by permissions. For example, Brett and I both belong to the open group “Gaming and the Liberal Arts,” which is “a resource for liberal arts college and university faculty and staff who are exploring the uses of gaming in teaching, learning, and research.” In groups, members share links and engage in conversation around particular subjects of interest.

Diigo groups are well-suited for use with students. Derek Bruff at Vanderbilt uses Diigo in his course “Cryptography: The History and Mathematics of Codes and Code Breaking.” Here’s the relevant section of the course syllabus:

SOCIAL BOOKMARKING (http://groups.diigo.com/group/fwyscrypto)

You’ll need to sign up for an account on the social bookmarking site Diigo and join the group “Math 1111: Cryptography” I’ve set up. I’ll ask you to seek, find, and bookmark online resources relevant to the course—particularly the current events portion of the course—and save them to the Diigo group so we can all access them easily. I’m asking you to bookmark cryptography resources for two reasons: One is that doing so will give you a chance to make connections between the content of this course and other interests of yours, both academic and personal. The other is that by sharing interesting resources via Diigo, you’ll help enrich the learning experience for all of us (including me).

As you can see, Derek has chosen to make this class group site publicly viewable, although membership in the group (and thus the ability to add links and comments) is restricted to students in the class. He observes in his article “Leveraging Student Interest Through Social Bookmarking,”

Social bookmarking is an example of a set of teaching practices sometimes called “social pedagogies.”  These are practices in which students construct knowledge by representing that knowledge for authentic audiences.  The instructor is rarely an authentic audience for student work—the fact that we make the assignments and dole out the grades means that we’re an important audience, but not a particularly authentic one.  Students can serve as each other’s authentic audience, however.  And when students have such an authentic audience for their work, they often do much better work.  Moreover, social bookmarking in a course setting helps students see that they are part of a real learning community, one in which everyone (not just the instructor) has useful ideas and perspectives to share. I want my courses to be learning communities, and I’m glad to have social bookmarking tools that help me create those communities.

Diigo is mostly free to use, though there is a premium version (~ $40/year) that does have one killer feature…the ability to cache webpages. This means that you are not just saving the link, but also a copy of the page itself. “Link rot” is a serious problem on the web, and I seem to be seeing more frequent warnings about it…for example, this recent article in Atlantic magazine, “The Internet’s Dark Ages.” Lots to think about here, though this is a topic that deserves its own post sometime.

So…for more conversation and demonstration, join us for this week’s digital pedagogy workshop.

Curated Resources:

Wikipedia Assignments: What, How, and Why

This week’s Digital Pedagogy workshop, “Wikipedia Assignments: What, How, and Why,” will occur Tuesday, October 20, from 4:30–5:30 pm, with a repeat on Wednesday, October 21, from 11:00 am–noon. The location is the library computer lab (Abell 208).

wiki

Does Wikipedia have a place in a college course? Do you know how your students are using Wikipedia? Well, one way to answer those questions is to have students actually contribute to “the free encyclopedia that anyone can edit.” Instead of seeing Wikipedia as an unreliable and nonscholarly reference for your students to consult, consider having them gain some skills in public knowledge construction by adding new content and/or improving existing content on the site.

A growing number of instructors are integrating Wikipedia editing assignments into their courses. Many pedagogical benefits for students have been observed, including:

  • writing for an authentic public audience, which motivates students to do their best work since they are contributing to a “real” and widely used source of information
  • teaching students to navigate the rules and social norms of an online community of knowledge creation
  • helping students to clarify the distinctions and relationships among primary, secondary, and tertiary sources of information and knowledge
  • developing media and information literacy and collaborative research skills
  • engaging students with a variety of feedback to their work and connects them to a community of persons interested in improving knowledge of a given subject or topic
  • providing a rich context for reflection on epistemology, verifiability, neutrality, point of view, and other themes in the philosophy of knowledge

Instructors are not simply on their own in designing these assignments. In fact, the organization that runs Wikipedia recently created the Wiki Education Foundation (@WikiEducation), “which serves as a bridge between academia and Wikipedia.” WikiEdu has developed an extensive set of tutorial resources as well as a streamlined process for setting up a Wikipedia assignment and integrating it into a course. The “For Instructors” page at WikiEdu has links to online training for educators and students, an array of online and printable handout brochures for students covering all aspects of editing on Wikipedia, and guides with case studies and discussions of Wikipedia and the production of knowledge. WikiEdu will also help instructors set up a dedicated Wikipedia page for their class to organize the assignment, and provides a WikiEdu staff person as a liaison and guide.

Students and instructors will learn about both the conceptual principles that undergird Wikipedia as well as the technical aspects of working in the Wikipedia editing environment. There are the “five pillars” that summarize the fundamental principles of Wikipedia, such as embracing the neutral point of view, avoiding original research, establishing the reliability of sources, and respecting copyright and avoiding plagiarism. Students sign up for user accounts on Wikipedia and work through a scaffolded set of exercises designed to familiarize them with the standards, norms, and procedures for editing articles. New users typically establish “credibility” in the Wikipedia community by making small edits on grammar and style and gradually progress to more substantive proposals for changes and additions. Students learn how to interact with other users who have already worked on an entry and who may support or contest new revisions or updates.

Here at Austin College, Erin Copple Smith incorporated a Wikipedia assignment into her Fall 2015 course, “Hollywood Stars.” Erin developed a very thorough description of the assignment for her students, which might well serve as a guide for other interested faculty. As she explains,

Wikipedia is a free online encyclopedia written, edited, and curated by internet users. It’s an incredible resource and one worth learning more about, which is why students will be undertaking this assignment. Throughout the process of becoming a Wikipedian, students will learn about Wikipedia’s nature and development, come to appreciate the complexities and advantages of online collaboration, and contribute meaningfully to the distribution of knowledge by adding to or creating their own Wikipedia entry. Moreover, they will gain firsthand experience doing proper historical research into stars and celebrities.

Erin worked with the folks at WikiEdu to set up the course wiki page and a detailed week-by-week timeline of assignment expectations and milestones. There are two versions of the course page: one that is public, and another with additional information that is password protected so that only she and her students have access. All student work is tracked so that Erin can easily follow each student’s activity in Wikipedia. The assignment moves toward two final deliverables: (1) a contribution of at least 400 words to an existing Wikipedia entry or the development of a new Wikipedia entry on a star of one’s choice, including the addition of at last eight reputable resources to the page’s references; and (2) a 3-5 page reflective paper, in which students engage with the following questions:

What did you learn about your subject? What did you learn about the research process and the act of contributing to scholarly assessment of stars in a popular/populist venue? What did you learn about Wikipedia and the way we produce and consume “facts” today? Most importantly: How does a resource like Wikipedia contribute to the formation of star images as discussed over the course of the semester?

So if you’d like to know more about what a Wikipedia assignment might look like in your class, and get some first hand experience editing Wikipedia articles, join us for this week’s digital pedagogy workshop.

Curated Resources

A Story Maps Journal Example–Grayson County Historical Sites

This week in the digital pedagogy workshop we learned about Story Maps, a free version of the most widely used digital map software, ArcGIS. To demonstrate how Story Maps works, and to get participants started on their own mapping projects, I created a project called “Grayson County Historical Sites.” I thought it would be interesting  to visually display the location of all 130 state historical markers that are located in Grayson County, Texas (home to Austin College for you non-locals) and to create a content-rich presentation connecting the marker locations on the map with textual narration, images, videos, and links to further information about each site. So far I’ve added about a dozen of the sites to my project, but that’s enough to show off a lot of what Story Maps can do. Here’s an embedded version; scroll through the side panel and navigate around the map.

You can get a further sense for the capabilities of Story Maps by visiting their gallery of public projects, where you can browse through dozens of attractive mapping projects organized and searchable by subject matter and template.

The full professional version of ArcGIS is installed on machines in several of the computer labs on campus, including those in the library and the IDEA Center. So that is available for more sophisticated and complex mapping projects. But as a starter experience with GIS, Story Maps offers a surprisingly rich set of features, is free to use, and can be accessed anywhere you have a network connection. It is completely web-based, so there’s no need to download or install anything on your own machine. Projects are created and stored on the ArcGIS website, where users have 2GB of storage. That’s an ample amount, especially because any media files you add to a project are stored elsewhere. You just need to create an account, or use your existing log-in credentials if you already have an ArcGIS account.

The “Map Journal” template is actually one of a number of layouts you can use to combine your map with other content that you bring into the project space. But I think it is the most versatile of those layouts. The presentation area contains two primary spaces: the “main stage,” where your map is displayed, and the “side panel,” which holds the content and material that you connect to the map. There is a flexible set of tools that allows you to create dynamic interactions between the side panel content and the content (location points, shaded regions, etc.) on the map. I’ve included a number of these features in my example project above. Projects can be kept private or made public via a URL to a location on the ArcGIS website. In addition, projects can be easily embedded on other websites, which is what I have done here.

For this example, I’ve pulled in material from a variety of sources on the web. I started with the historical information section on the county’s website, and as I explored the information there I imagined how much more effective the presentation would be with a visually appealing format such as Story Maps. I searched for other resources as well, using Google’s image search for photos, filtering the results to return only those “labeled for noncommercial reuse.” I also searched on the photo repository site Flickr and found images with Creative Commons licenses. Of course, I could have created my own media, but I didn’t have the time right now to do that. The text of the sections in the side panel is taken from the historical markers themselves.

Now it’s possible that such a map project already existed somewhere online…I didn’t find one. And when you use maps in a class, you might well make use of already existing maps and map projects. But there is a value in creating your own, and in having your students do so. For students in particular, to actually build the map and the associated content is a generative act of learning, meaning that because they have actually constructed the project rather than simply looked at someone else’s version of it, they are far more likely to have created the knowledge structures in their minds that will persist in long-term memory.

As with all web-based projects, there are several issues to keep in mind. You need the appropriate permissions, attributions, and credits for any content, such as images and videos, that you bring into the project. Also, because all media used in the project are stored across various web servers and repositories and accessed by URLs, any change in their location or address will cause them to disappear from the project unless you update the address. And of course you need a reliable internet connection to work on and view the project.

If you’re interested in learning more and weren’t able to make the workshop this week, just let me know and we’ll make some time to get you up and running. I’ve also created a workflow guide to the main steps of the process, and there are also tutorials on the Story Maps site. We look forward to featuring faculty and student map projects here on DP@AC!

Where It’s At: Basic Digital Mapping for Your Class

This week’s Digital Pedagogy workshop, “Where It’s At: Basic Digital Maps for Your Class,” will occur Tuesday, October 13, from 4:30–5:30 pm, with a repeat on Wednesday, October 14, from 11:00 am–noon. The location is the library computer lab (Abell 208).

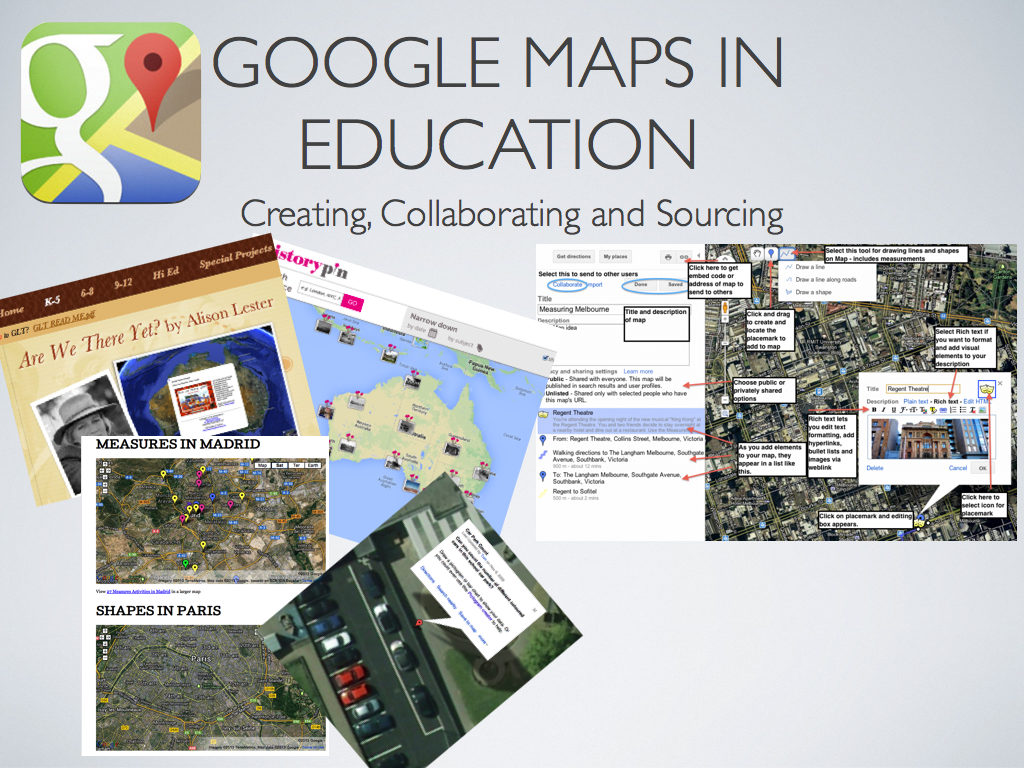
Google-maps-in-education.001-001-2lr147f

Most of us are used to getting driving directions and other geographical information from digital applications on our devices. But you may not have thought as much about how mapping projects can be effective elements of teaching and learning. Now, sometimes we use the term “map” in a broader sense to refer to any representation of content in graphical form; thus there are “mind maps” and “concept maps,” for example. But in the more specific sense, maps are used to present data and information that can be connected to spatial coordinates of latitude and longitude. Across the curriculum there are many possibilities for visualizing content with maps, bringing about deeper insights and more effective learning in the subject matter.

The term “Geographical Information Systems” (GIS) refers to the category of applications and practices involved in mapping projects. These projects, and the associated tools needed to produce them, range widely in complexity. The most commonly used professional GIS tool is ArcGIS, which is installed on computers in a number of workstation areas here at Austin College, including the library and the Idea Center. One of our Mellon grant recipients, political science professor Don Rodgers, is leading a project that utilizes ArcGIS in the Social Entrepreneurship for Poverty Alleviation (SEPA) initiative, a collaborative venture between Austin College and the Texoma Council of Governments.

While ArcGIS is the current standard for GIS software, its use involves a significant level of training and cost. Fortunately, there are more accessible resources at hand if you are interested in incorporating mapping projects and assignments in your courses. For starters, there’s Google Maps (and Google Earth), which is more than just a navigational app on your phone. As Adeline Koh recently observed in an article on digital pedagogy,

Starting with Google Maps to integrate digital humanities [and other liberal arts] in the classroom is relatively painless, easy and free. The tool is easy to navigate, and as many students are already familiar with the Google interface, this familiarity helps them to get to the meat of the assignment more quickly. Instructors interested in exploring mapping projects should thus probably start with this tool. While much more sophisticated projects involving GIS and visualization software are possible, they require considerably more investment in terms of course time and resources.

Another application that is free to use and worth considering is Story Maps, created by ESRI, the same company behind ArcGIS. Story Maps offers a wide range of attractive mapping features; for an extensive gallery of projects created with Story Maps, peruse their gallery of showcase projects, organized by topic.

Both Google Maps and Story Maps allow you to embed narrative text, images, and mulitmedia content into a mapping platform in order to create rich spatial visualizations of your material. The projects can be created collaboratively, thus giving rise to the practice of “social mapping.” For one interesting example of an ongoing collaborative social mapping enterprise, check out some of the projects at Historypin.org.

At this week’s session, we’ll brainstorm ideas for incorporating mapping projects in your class and work together on a simple project that will demonstrate how you can use some of these basic mapping tools. Looking forward to seeing you there.

Curated Resources

Digital Publishing With Scalar

scalar-logoThis week’s Digital Pedagogy workshop, “Digital Publishing with Scalar,” will occur Tuesday, October 6, from 4:30–5:30 pm, with a repeat on Wednesday, October 7, from 11:00 am–noon. The location is the library computer lab (Abell 208).

This week we explore Scalar, a new web-based digital publishing platform. Several instructors here at AC are experimenting with Scalar this semester, including Nate Bigelow and Mike Fairley in their CI classes, Ivette Vargas-O’Bryan in Introduction to Buddhism, and Dave Griffith in an upper–level marketing course. Like WordPress, Scalar is a free open-source application that is server-based and that facilitates the creation of multimedia content and projects on the web. While there are significant similarities between the two, Scalar is particularly suited for the production of free-standing long-form projects that incorporate large amounts of rich media (images, video, audio, maps, timelines, etc.) within the format of a “book,” though a book reconceived in a native-digital format. As the trailer below states, Scalar projects might be thought of as a cross between an e-book and a website:


Among the features highlighted by early users of Scalar are the following:

  • Well-suited for group assignments, in which students work together to produce a single, collaborative deliverable. All versions of a project are preserved, and every user contribution is tracked.
  • Incorporates full commenting and annotation functionality on all forms of media
  • Operates with a “flattened hierarchy,” in which all forms of content (pages, media, comments, annotations, tags, paths) have an equal status and can be interrelated in structures designed by the author.
  • Allows a variety of page layouts and customizable styling options
  • Full control of project accessibility, from private to restricted to fully public.
  • There are agreements with several major digital archives (the Internet Archive, Critical Commons, the Metropolitan Museum of Art, and others) that allow Scalar to easily incorporate digitized materials into projects with full permission for fair use.
  • Material may also be easily imported from other Internet repositories and file storage sites such as YouTube, Vimeo, and SoundCloud, as well as local sources.

You can see some examples of Scalar projects at this showcase gallery. While none of the projects at Austin College are in public mode yet, you can begin to experiment with Scalar if you wish by creating an account at scalar.acdigitialpedagogy.org. Come to the workshop, and we’ll walk through some of the basics together.

Curated Resources

Incorporating Student Blogging in Your Course

This week’s Digital Pedagogy workshop, “Incorporating Student Blogging in Your Course,” will occur Tuesday, September 29, from 4:30–5:30 pm, with a repeat on Wednesday, September 30 from 11:00 am–noon. The location is the library computer lab (Abell 208).

Is blogging really “key to the future of higher ed?” Even if you’re not prepared to go quite that far, you might see some value in helping students to write and work in a space on the web that facilitates peer interaction and the possibility of a broader and more authentic audience. The rationale for faculty blogging discussed in the previous post applies just as well to students…maybe even more so. As the college explores strategies to enhance student writing and digital communication skills, the encouragement of student blogging at Austin College could help create a wider and more visible culture of writing in our academic community.

I am aware of at least two AC faculty members who currently  include student blogging among course activities. Brett Boessen (media studies) has done so for a number of years; for example, see this description of blog assignments in his recent course, “Elements of Media Making.” And in “Student Blogging in PSYCH 101,” Ian MacFarlane reflects on his adoption of student blogging in that course:

Students are required to make an introductory post, which provides some background about themselves and their interests regarding the class, and to post a comment on a classmate’s blog. Over the remainder of the semester, students are responsible for posting seven more times on their own blog and seven more comments on their classmates’ blogs. Every Monday, I post two prompts related to the content we either have just covered or will cover the coming week (for an example see here; for the complete series of prompts, see here), so there are always options for students.

Ian considers the practice “moderately successful” so far and notes, “While I continue to work on ways to get students to be more engaged with each other, I’m also working on generating traffic to their blogs from people outside of the class to provide students a wider forum to discuss their ideas.”

The chance to give students “a wider forum to discuss their ideas” strikes me as a really worthwhile goal. Derek Bruff, mathematics instructor and director of the center for teaching excellence at Vanderbilt, gives a compelling account of the value of publishing student writing on a course blog:

Last fall , for my first-year writing seminar on the history and mathematics of cryptography, I posted my students’ expository-writing essays on our course blog. The assignment had asked students to describe a particular code or cipher that we had not already discussed—how it came to be, how it works, how to crack it, who used it. They described more than a dozen codes and ciphers. It seemed a shame that I might be the only one to read such interesting content, so I asked the students to read and comment on two papers of their peers. The course blog provided an ideal platform for that task.

About a week later, one of my students arrived at class excited. He had Googled his paper’s topic (the “Great Paris Cipher”) and saw that his paper was the third result listed. He said, with a little trepidation, “Some high-school student is going to cite my paper!” Another student asked if I had seen the lengthy comment left on his blog post by a cryptography researcher he had cited. “That’s pretty cool that the guy in my footnotes read my paper,” he said….

Developing a successful course blogging practice requires a willingness to experiment with, reflect upon, and revise one’s course design. Mark Sample, director of the digital studies program at Davidson College, has been chronicling his ongoing pedagogical experience with student blogs and public writing at the ProfHacker blog, and describes a threefold framework for thinking about blogging assignments in terms of the overall structure of the blog, the rhythm of postings, and the use of different student roles.

I’ve tried two overall structures:

A hub-and-spoke model, in which every student sets up his or her own blog, and I aggregate their postings on the main class blog.

A centralized class blog, in which all the students have accounts on the same blog, and their posts and comments all show up in the same place.

I’ve experimented with different rhythms:

The free-for-all model, in which students simply must post 10 (or some other number) of blog posts by the end of the semester.

The checkpoint model, in which students must post a specified number of posts by particular checkpoints spread throughout the semester.

The weekly model, in which all students (or, if using roles, a subset of students) must post every week.

Finally, I’ve increasingly relied on assigned roles, so that not every student is posting at the same time, and furthermore, so that each group of students has a specific task for that week. For example, most recently I divided a class of 25 students into four groups, rotating week-to-week from one role to the next:

first readers–these students are responsible for posting initial questions and insights about the day’s material to the class blog the day before class meets.

respondents–students in this group build upon, disagree with, or clarify the first readers’ posts by the next class meeting.

searchers–students in this group find and share at least one relevant online resource. In addition to linking to the resource, the searchers provide a short evaluation of the resource, highlighting what makes it worthwhile, unusual, or, if appropriate, problematic.

the fourth group has the week off in terms of blogging.

As you can see, there are many possibilities and approaches to incorporating student blogging in your course. So join us for more conversation and demonstration at this week’s workshop.

Curated Resources:

css.php